Pages

Showing posts with label French. Show all posts

Thursday, September 20, 2012

Frenchy Grain Tray

Sometimes we see an image that we just cannot get out of our mind.  Our creativity goes on overdrive.  That was the case with the vintage look gran label that I used for the Vintage Look Grain Pillow..  I even mentioned in that post that I was having problems doing things right the first time and had messed up the paint on the tray.  First let me show you the good before I show you the bad and ugly, okay?


I have shown you this little corner of the kitchen counter before minus the tray.  I had always intended to put the tray there when I finished it, but didn't have it quite done when I showed you some of the fall look here.

When I was working on the tray, I decided to wax it, but the ink started to run a little.  Thinking I had wiped all the wax off, I tried a spray sealant and this was the result!


The paint began to bubble up.  Unfortunately, I touched it and the paint came off.  It seemed like a good idea to wait for a bit to see what happened when it all dried.  That was a good thing.  When I came back several hours later, the paint was still bubbled a bit, but was dried.  Since a vintage tray might have some flaws in the paint, I simply used a little paint and a patting motion to touch up the area where the paint had come off.


Even though the antique glaze is not quite the same in that spot, it really ended up looking okay.
 
Besides, since the pitchers are in front of the lower part where the flaw is, most people won't even notice that the paint is a tad bit whiter in that spot.  Not a bad fix for an Oops!


This tray is actually meant to be used on a desk in an office, but it looks quite at home with the Fall look on the counter.  I just love the wheat motif on this label from the Graphics Fairy.  The next time you see this tray, it might have a chocolat label and be used in a Christmas vignette.  The nice thing about painting things is that they can be changed with a bit more paint!


Hope you are ready for Fall.  It's just hours away now!  Hope you are getting some nice crisp days at least once in a while!  We are still plenty warm during the day, but the mornings and evenings are now cooler here in the desert Southwest.
 
 
Happy Fall!
 
xoxoXOXOxoxo
 
Lois


Sunday, September 2, 2012

Glimpses of Fall

September is the start of my favorite season -- Fall!  While here in the desert Southwest, we are still in triple digits most of the day, September is the beginning of a cooling trend, or so we hope!  In other parts of the country the breezes are crisper, a leaf or two is beginning to turn for that wonderful crunch as we walk on a path through the woods.  The air smells different, somehow it is fresher.

Apple and pumpkin desserts and the aroma of Cinnamon in the air is just what a creature weary of the oven blast of summer craves.  Ah, Fall!

The first of September sends me scurrying to locate the Fall decorations from previous years and thinking of new ones for this season.  After all, the stores have had Fall items on the shelves since the 4th of July, so it must be time.

I'm ready to start!  Here is a glimpse of the direction my Fall home is taking.

 
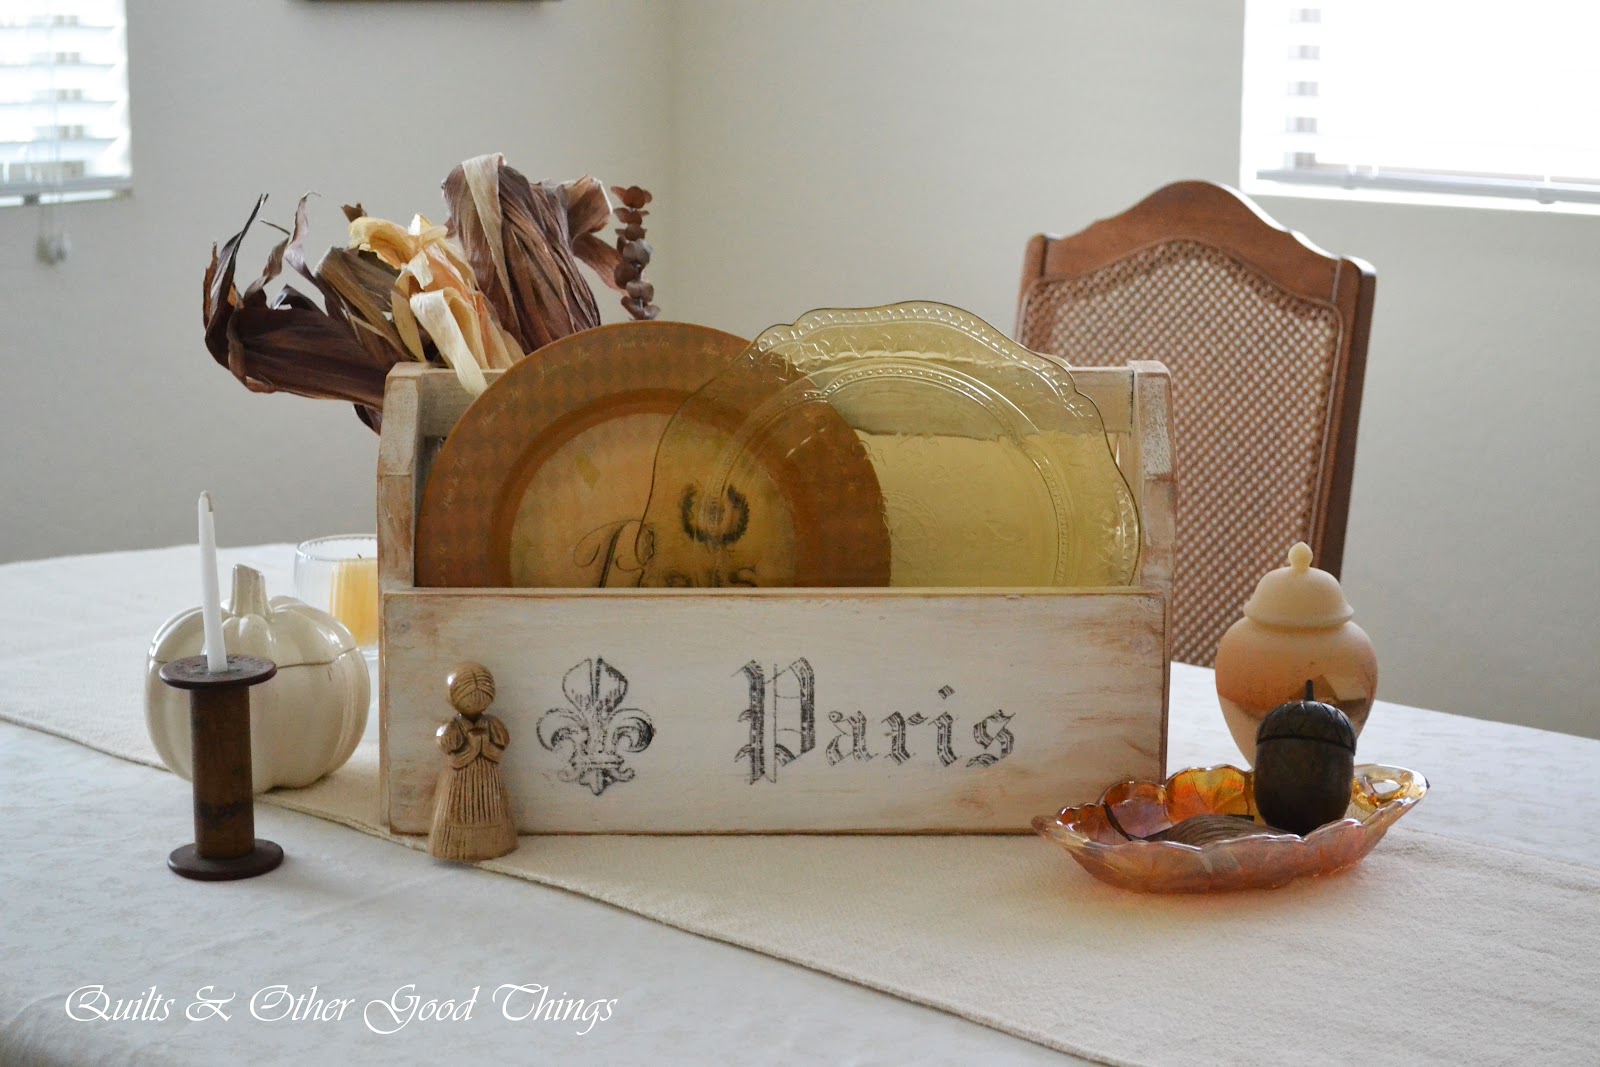
This tablescape began with a toolbox made by our grandson C2 and our SIL.  They made one for each of the families for Christmas a couple of years ago.  This, for them, started as a Boy Scout project.  Ours went to the garage where I watched it.  Never was a tool put in it.  So this year, I asked my dear hubby if I could "do something with it".  He said, "sure". A coat of white paint and a little antiquing and it was starting to look the way I wanted it to.  With the addition of a graphic from The Graphics Fairy and a lacy Fleur De Lis, it was really looking like what I envisioned.  I used the freezer paper method to transfer to the wood after first reversing the image.  All I had to do was print onto the waxy side of the freezer paper and with the bowl of a spoon burnish the image to transfer it to the wood.  I love the antique look this method gives on wood.
 
 
Here is a view of one side of the toolbox. The cream colored burlap table runner is from last year. The table cloth is really a length of 108" wide white on white fabric sold for quilt backing.
 
 
The back side shows the back of the ironstone platter, has the same transfer and announces the season.
 
 
I think it definitely says Fall.
 
 
The neutral tones of the pine tree quilt and the painting of a round barn in Iowa also speak to the neutral Fall colors of the room.  There is also a photo of a church in Alabama above the round barn.  On the other side of the window, not shown here is a pen and ink drawing of an historic building in Wisconsin and a watercolor of the Town Clock Plaza in Dubuque, Iowa, all done in more or less Fall colors.  In fact prior to living in Arizona, our houses had been decorated in shades of gold, forest green and russets - very much Fall colors.  I still love them, but Blue, Yellow and tints of white are predominant in this house -- most of the year, but not Fall!
 
 
In one corner a small antique chest holds a basket of dried grasses and flowers and a faux pumpkin seed packet.
 
 
Next to the china cabinet a ceramic high top boot sits next to a silver bowl full of vanilla potpourri.
 
 
The dining room is ready.  Now it's time to "fallify" the rest of the house.  But first, maybe I'd better make some apple butter to make the house smell as yummy as the dining room looks.
 
Are you ready for Fall?  What is your favorite thing about this season?  Will you send me some Fall colored leaves?  I miss that part a lot!
 
 
xoxoXOXOsoso
 
Lois


Joining These Parties
 
The Graphics Fairy Brag Monday 
Cowgirl Up Party at Farmhouse Porch
Dixie & Dotties Fall Y'all
Feathered Nest Friday at French Country Cottage
Life on Lakeshore Drive  Bouquet of Talent


Monday, August 27, 2012

Pottery Barn Knockoff Curtain Tutorial

Here is the Pottery Barn Knockoff Curtain Tutorial that I promised you.  I will share with you how I did the curtain first and then I will tell you what you need to do to customize it to your measurements.

You will need ticking fabric, a wide ruler, water soluble pen, a sewing machine with both a regular foot and a gathering foot, thread, pins, a curtain rod the size you need, rotary cutter and mat or scissors, an iron and ironing board will be key, as well. Optional:  Even feed foot, seam gauge..

While this is a sewing project, it is all straight sewing so any one can do it.  The only tricky part is the ruffling if you have never done that before.  Other than that, it's easy peasy.

Here is the finished product of my project and a close up of the ruffles.


Here is the inspiration.from Pottery Barn.
 
 
Image from Pottery Barn web site.
 
They obviously had a little more space for photography than my daughter's narrow galley kitchen allowed for. She was sitting on the counter on the opposite wall to get that photo! We opted for the red ticking rather than black, as well.
 
For the length to cut, I added 8" for the top hem (4" double) and 8" for the bottom hem (4" double) to the measurement of the opening including the trim at the top of the door.  For the width, I only needed one width of the fabric which included 4" (side hems 1" double).
 
1.  Remove the selvage edges off the fabric by either tearing or cutting.
 
2.  Measure the length you need by placing the fabric on the floor and using a steel tape measure. Be sure that you are cutting at a 90 degree angle so that your panel will be square. I've been known to use a carpenter's square for this process.   In this case since I was using striped fabric, I just made sure the lines on the wide ruler (Omnigrid 6" x 24") lined up with the stripes.

 
3.  Mark and cut both top and bottom to make sure you have square panels . Yes, I'm repeating that -- it's very important
 
4. If you have more than one panel, sew the length together with a serger or use a flat fell seam so the raw edges are covered. 
 
5. Press 1" under for the side hem and then fold again so the raw edge is encased forming a double 1" side hem. Pin as you press the second time.
 
6. With matching thread straight stitch along the edge of the hem to hold in place.
 
7.  For the bottom hem, you will do exactly the same thing except you will fold up 4" and then fold up again to form a double 4" hem.  This will make the curtain at the bottom edge hold its shape better and look more polished.  Custom drapery shops use this technique which is why their curtains look so nice. I always close the sides of the hems with a slip stitch as well, but that is optional.
 
 
If you are observant, you can see that I actually press up the 8" and then fold in the 4" to the first crease.  Either method gets the same results.


8. Stitch the bottom hem with a straight stitch along the top fold.
 
 
9  The first row of ruffles will be along the seam line.
 
10.  On the outside, measure up the distance you want your ruffles apart.  I measured up 4" from the stitch line of the hem for the second row and used a water soluble pen to mark the sewing line.  If you want more rows, just keep marking lines for each row at even intervals.
 
 
11. Make ruffles and attach.: 
 
You will want to have the ruffles 1-1/2" x 2 times the width of the finished curtain panel. Be sure to include this amount when you figure how much fabric to buy. (1-1/2 " times the number of widths you need for each ruffle)
 
 To determine what the settings were needed for my ruffle foot, I experimented with 6" x 1-1/2" pieces taking note of which setting gave me the gathering density I wanted which was 2 x the width of the curtain. The strip in the middle is approximately 3" after gathering, so those were the settings I used.
 
 
This is the ruffling foot on my Bernina 1230.  Ask at your local dealer what foot you need to make ruffles on your machine.  Ask them to demonstrate how it works.  My instructions are for my machine, but when I had a Singer with a similar foot, it worked the same way.
 
 
First make sure your machine is set for a straight seam. I like to use the needle down position. If your machine has it you may want to engage it during this step.
 
 
Adjust the stitch length to the setting needed for the ruffle density desired.  I used a 5 which is the longest on my machine.


Adjust the tension tighter to get the ruffle density desired.  You will need to play with this on a scrap sample to make sure you get the desired effect.
 
 
I needed a 7-1/2 setting.  Once determined what gives you the correct effect, write this down.  It may vary depending on the weight of the fabric you are using, but it would be a starting place if you do ruffles on another project.  Keep these notes!
 
 
Stitch down the center of the length of 1-1/2"it will ruffle as you sew.
 
 
When you have stitched as many ruffle lengths as desired, it's time to pin them in place.
 
 
For the first row, turn under the end and pin in place.  The center should be along the seam line for the hem.  Measure from the bottom of the hem using a seam gauge or other ruler and pin the ruffle in place.leaving the last end loose.
 
 
Pin the next row(s) so that the stitched line matches up with the line you have drawn on the fabric. Be sure to turn under the beginning of the ruffle, but leaving the ed loose as before.
 
 
Once the rows are pinned in place, you are ready to stitch.
 
 
Stitch down the center using an even feed foot if you have one almost to the end and tuck under the end for a nice finished edge.  The edges on the length of these ruffles are raw so they will fray a bit.  If you want to finish them you may, but you will need to allow for more width on the ruffle pieces you cut.  I thought the raw edge would be nice on these.
 
 
Hang on, we are almost done!
 
 
Before making the top hem, hang the rod if there is not one already hanging. For my daughter's we were replacing a bi-fold door so there was no rod.  Here are the before pictures.
 
 
Before with door closed.
 
 
Before with door opened.  Bi-fold door + 4 kids = not so good!


Delegate hanging the rod.  It takes two people anyway to measure and hold pieces.


Check for the final length you will need. Curtain should be about 3/4" to 1" off the floor.  If you are using rings, as we were, allow for the amount down from the rod the curtain will hang attached to the ring.


Using a metal tape measure, and a partner, measure the length where the fold will need to be based on the actual measurements you just took of the opening.  Airwen acted as a weight and Prince was not interested in helping. Airwen was quality control and looked over my shoulder often! Note: both Prince and Airwen adopted my daughter's family - Prince followed them home and Airwen was born in the furnace room of one of the schools Mindy inspected for disaster training.
 
 
Before stitching, check the actual length by hanging before stitching and make adjustments.  If using a telescoping rod, sometimes you need to adjust for the side where the smaller metal rod is.  This is usually only a fraction of an inch, but adjust it so the bottom of the curtain remains even.


Press, fold and pin the top edge as you did for the bottom hem and stitch in place.
 
 
Attach to the rod using the rings.  An uneven number of rings is perfect.  Place one in the center and one on each edge and then attach the remaining rings with even spacing between.
 
The final step is to finger press the folds from top to bottom and tie the curtain in place in an open position.  Leave them for a couple of days this way to set the folds for a nice looking curtain.
 
 
For custom measurements.  Add 16" to the measurement of your opening.  If this is a window, usually rods are hung about 4" above the trim, so add the width of the trim plus the space to the rod.  You can adjust at either the top or bottom hem, just don't cut too short.
 
For the width, you will want about 2-1/2 times the width of the rod.  If you are hanging the rod for the first time and want "stack back" which is the amount of space needed for the curtain to hang beyond the glass when open, you will need to figure extra width for that amount.  The amount you need for the stack back is dependent on a lot of factors, such as if there are pinch pleats at the top and the weight of the fabric.  It is usually somewhere between .3 and .5 times the width of each panel added to each side if hanging a pair and to one side for one panel on a sliding door.  You may want to check with a professional for the exact amount or Google stack back to figure your own.
 
Wow, believe me when I say it took almost as long for me to write these instructions as it did to make the actual curtain!  Though it takes a lot to explain the how to do it, it really is simple straight stitching plus measurements.  Okay, figuring out the ruffle could be tricky, but it's still not hard to do.
 
If you have any questions, feel free to ask.  Remember this is just the way I do it, it is not the only way to make curtains.
 
 
One last look at the finished pantry curtain. This was taken just after finishing and had not been tied to set the folds at this point.
 
Please leave me a comment to let me know what you think of the PB knockoff curtains.  I love to hear from you!
 
xoxoXOXOxoxo
 
Lois

 
Linking to:


Pinworth Projects Party at Just Us Four


Thursday, August 23, 2012

Goodwill Goodies

Two weeks ago when I went to a sew day at Diane's, we took a little excursion to a Goodwill Store that was close to her home.  So far I have not done anything with these great finds, but they have so much potential!

Here are the things that I found that day.

 
Can you see the possibilities?  The crystal vase and the glass place in front will probably become a pedestal stand like I showed you here.
 
 
The plate was $2.99.
 
 
And the crystal vase was, too.  Where can you get a great pedestal plate for $6.00?  It will look so elegant with Christmas goodies on it!
 
The tray will be painted and take on a Frenchy personality. It was really a steal.
 
 
Only $1.99 for this great little tray!
 
 
All the goblet needs is a little polish and a white rose in it to look really great!
 
 
For years I had a taller glass tree container that usually held candy at Christmas.  Unfortunately, last year one of the granddaughters did not realize the lid came off and turned the tree over to examine it.  The glass lid did not survive the fall onto the tile floor.  This one is shorter, but it will still be cute AND it has a safety feature -- the lid is held on with the plastic stopper so no accidents can happen to this one.


The butter yellow tablecloth was only $199.  And, best of all, it is oval!  My round kitchen table becomes oval with the leaf and the dining room table is always an oval.  How cool is that?  I can hardly wait until Easter!  I'm already planning a wonderful table scape using this yellow background!
 
 
The blue and white ironstone is not old.  It is marked with an English ironstone mark on the back, but the date is 1982.  However, the glass dome fit it perfectly and I'm a sucker for blue and white dishes!
 
The wall pocket was the most expensive item at $4.99, but it won't look like this the next time you see it.  I have big plans for it involving paint and flowers.
 
Be sure to stay tuned for the transformation of these items.
 
Do you find things at Goodwill?  Do you leave them as they are or do you look at the items and see something new and improved from your junking finds?
 
Be sure to leave me a comment to tell me that you were here and what you would do if you found these items.
 
I'm still working on the Pottery Barn Knockoff Curtain tutorial, I haven't forgotten.
 
xoxoXOXOxoxo
 
Lois 


Saturday, August 18, 2012

Home Again

Happy Saturday, friends!

As you read in my last post, I was away from the Internet this week.  As I was unable to get my Blogger for Droid to publish, here are a few highlights from this past week.  I will fill in the details as I get the rest of the photos from two different cameras edited.

Last Sunday we were able to celebrate our daughter's birthday with her.  I had made a Pottery Barn knockoff curtain for her pantry door.  There will be details, but here are a few photos of that project.


Daughter Mindy grabbed the camera as I hung this.  Yes, the bi-fold door is still in place, but it will be taken down.


The folds had not been tied in place to set them yet in this photo.


Here is a detail of the ruffles.  The Pottery Barn shower curtain has 4 rows, but as this is a narrow curtain, we decided two would work.  The ruffles have raw edges so will fray over time giving a frilly  look.


On Tuesday, Diane and I left early to go to Joyce's cottage in the woods for a quilt retreat.


Diane drove, so I got to take a lot of photos of the Ponderosa pines.


We got up early and stayed up late.  I sewed a LOT of quilt chains.


They look better organized.  There are two blocks that are positive/negative in the finished quilt.  I only sewed one of the dark blocks together to see how they would look.  The rest of the blocks are in all those chained together parts.


Joyce provided the location and Diane and I did the cooking.  I learned that cooking at over 7,000 ft. altitude requires adjustments even when melting candy coating.  The coating dried out and I only got 3 of the shells for the mousse dessert made.  The rest just went in little cups.


A trip into Show Low allowed us to go to a couple of antique shops.  I'll share more of these photos later.

It was a great week spent with friends sewing, laughing, eating and sharing.  All too soon, it was time to go back down the mountain from the 70 degree weather to the 100 plus degree weather in the Valley of the Sun.

There will be more details on each of these once I get all those photos edited.

What have you been up to lately? I hope it has included friends, family and fun!

I missed you!

xoxoXOXOxoxo

Lois