Pages

Showing posts with label sewing. Show all posts

Tuesday, August 21, 2012

Mini Quilt Retreat

Three friends in a cottage in the woods with fabric and sewing machines -- what could be better than that?  For three and a half days last week Diane, Joyce and I sewed and talked and laughed and shopped and ate!  What a lovely time we had.

Diane and I drove up to the mountains to Joyce's little cottage last week.  In case you think Arizona is all desert and cacti, here are a few photos to show you a different side of Arizona.


Diane was driving which left me free to take photos through the windows.


The views are breathtakingly beautiful!


The lower areas still have rocks and cacti.


It makes one wonder how and why the west was settled!  Can you imagine going through this rough terrain in a covered wagon or walking?


I would have stayed here -- so cool and beautiful!


We were at above 7,000 ft and in the cool, refreshing 70's!


When we arrived, the property was covered with trees that were a bit shorter than the tall pines we traveled through.  We also passed areas where regrowth was just beginning where forest fires had claimed many acres of trees.


The garden keeps the larger critters out, but a squirrel had to be chased out shortly after we arrived.


The squirrel got the ripe tomatoes.


I loved the remains of this felled tree.  Stumps and logs have always intrigued me.


They are ready for the colder weather which will arrive soon at that high elevation!


This is the view from the back deck.  If you look closely at the center on the horizon line, there is another home.  There were closer homes on the other side, but no windows there, so it seems very private and remote!


As soon as we could, we set up our sewing machines and were humming away.  Well, we did stop to talk and laugh, too.


We each have our organization styles.  This is Diane's.  She was quite far in her project, so these are the smaller pieces yet to be joined.


Joyce had already started her project and had things all laid out to sew.


Mine was a new project, so I just had all the parts cut and in the container ready to begin chaining pieces together.


Diane is working on one of the snowball blocks to go with the stars on her quilt.


When I wasn't taking photos, I was making chains for an Fall colored quilt.


Lots and lots of chains.  There was bright sunlight streaming through the window behind me.


These are Diane's star blocks.  She had all of these done by the time we left, as well as all of the snowball blocks.  She was working on the bonus half-square triangle units from the snowball blocks by the last day.


Joyce's little bow tie blocks are tiny!  She will be making bow ties for a long time!


I only completed one of the dark blocks to see what it would look like.  The alternate block is the opposite - dark where the light is and light where the dark is.  Oops, I sewed way too many of the light 2" squares to the ends of the 6-1/2" rectangles.  I un-sewed these on the way back home!


A retreat isn't complete without chocolate.  Wednesday was my day to cook, and this was our dessert for dinner.  I learned that candy coating melts differently at a high altitude!  Some of it burned.


Still these look pretty cute, don't you think?  They were tasty, too, although the candy cup was a bit too sweet for me to finish.  But, it's all in the presentation, right?

All too soon it was time to head back down the mountain to the heat of the desert.  At least we had a few days of cool weather and a TON of fun with friends.

Do you go on retreats?  Do you get a lot done or are you there mostly to socialize?

Where is your favorite place to go and get away from the routine of your life?

Please share your favorite get away.

xoxoXOXOxoxo

Lois


Wednesday, July 18, 2012

Custom Ironing Board Cover

Ironing just isn't fun is it?  I've never heard anyone say, "I just can't wait to iron."  Well, except for granddaughter E, but that was during a quilt lesson and she'd never ironed at the time.  She was thrilled. And then there was the Turkish girl when I was teaching quilting to a group of Turkish women.  She was so proud because her job was to press as we worked on the blocks.  But still, usually people are not thrilled to iron so why not make it as pleasant as possible.

About 10 years ago I purchased a Quilter's Ironing Board from Shared Ideas, two friends in Iowa who were at the time making these boards and selling them. Now they live in different states so I don't know if they still make them.  They read my blog so if they do, they'll let us know.

The board is 48" wide by 16" deep and attaches with elastic to a regular ironing board.  It's perfect for ironing fabric and even sheets!  I keep mine on my board all the time.  But I need to have a pretty, coordinated cover on it so I make them.  The board came with instructions that included the small end of the actual ironing board, but I cover just the rectangle of the QIB which makes it easy when I do decide to remove it for some reason.


This is much more attractive to look at than metallic silver, don't you think? This same toile fabric forms the skirt on my cutting table.  I show you that in future post.

Start by measuring your board.  If you have a regular board, you can just trace the old cover.  You will need to measure the depth of the board and add the amount you want it to wrap to the back plus 3/4 to 1" for the casing that will hold the elastic cord and add that amount to the length and width of the board.


Because the fabric I used was 108" wide, I tore the fabric to make sure it was on the straight of grain.  I can get two covers out of 108" wide fabric so I can have one in the laundry and one on the board.  I use a lot of starch and though I usually cover the area with a piece of muslin, I sometimes forget and the cover needs to be laundered to remove the starch.


For a rectangular board, mark rounded corners and cut on the drawn line.


Serge the raw edges all the way around.  If you leave selvages on, you do not need to serge those.


Baste the curved corners.


Pin at least 3/4" for casing and gather the corners by pulling the basting thread.


Pin and press all the way around.  Notice the two pins going from the opposite directions?  They are to mark the beginning and ending of the stitching leaving a small opening where the elastic will be inserted.  By pinning from the opposite side, it will be a reminder for you.

Stitch close to the serged edge being sure to leave that opening!


Thread narrow elastic through a safety pin.  I tie the elastic through the hole and tie securely.  I don't want the elastic to come out part of the way through the process!


Insert the elastic into the casing and pull it through until the pin comes out of the opening at the other side from where you began.


Pull the elastic taut and tie securely.  The goal is for it to be taut, but not so tight that you cannot remove and replace the cover from the board.


Smooth the corners as much as possible.


Put the board back on top of your ironing board and you are ready to tackle that fabric.  Even shirts and other items can be ironed with this board in place.

If you used your old ironing board cover as a pattern, the process is much the same, but you will only have two square corners to deal with.

Hope you enjoy picking out your own favorite fabric and making a cheerful cover for your ironing board.

Have a wonderful, creative and peaceful day!

xoxoXOXOxoxo,

Lois


Monday, July 9, 2012

Time is Ticking!

Hi friends!  Hope you had a great holiday last week.  We didn't do anything special, but I spent a LOT of time at my sewing machine.


Time was really ticking away!

I made 7 pillows and 2 slipcovers for cushions and a whole lot of cording to go in the pillows and slipcovers. The ticking pillow above with the clock was made using a graphic from The Graphic Fairy.   Karen has such great graphics to choose from. I used  the transfer paper method again.

Everything I made goes in the loft area where the grand kids congregate when they are here. So I decided in addition to the clock, the alphabet would be fun. That graphic is from The Graphics Fairy, too. Won't these be fun for the kids?


At first I wasn't sure how these would look on the ticking, but they turned out great, don't you think?


See those four denim pillows on the seat of the church pew?  Yep, made those last week.  Also made the large denim pillow, but I think it needs something on it, so will work on it some more.  The flag pillow I told you about here.


The cushions on the wicker rockers needed covers.  In fact, this rocker never had a cushion before.


This pillow was made a while back.  Here is a closer look.


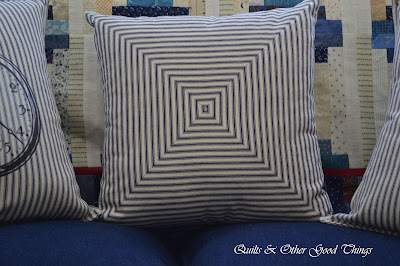
I kept seeing these ticking "maze" pillows everywhere so decided to see if I could make one.

One thing I learned about ticking -- it is not created equal.  Did you know there are different weights of this ticking stripe?  This pillow is made from a denim weight ticking.  The other pillows are more like quilt fabric weight.  The lighter weight comes 54" wide at Jo Ann's.


When this church pew "lived" in the Master Bedroom, it had a skirt so things could be stored under it.  I'm thinking of doing a ticking skirt for it now and maybe painting it white.  This pew is from the church I grew up in.  I remember when they were bought from an older church and refinished, so I would not be messing with the original finish.  Do you think white would be good?


Hope you enjoyed this pillow talk!  I have another pillow to show you in another post later, but it isn't made using ticking stripes.

Until next time,
xoxoXOXOxoxo,
Lois


Joining the following parties:
French Country Cottage's Feathered Nest Friday


Thursday, May 17, 2012

Tool Talk

What are your favorite tools for quilt making?  What are the tools you reach for over and over?

I have a favorite few that I use all the time and would be lost without them.  First there is my computer and computer software -- not just the Electric Quilt software, but lots of general software as well.

Next would be my cameras and the software that they use.  The collage below was something I recently learned to do.  I've been spending Fridays working on some aspect of photography and sneaking in a few minutes here and there to "play" with either the cameras or software, too.


While my phone takes an okay photo, it just doesn't have the flexibility I want in a camera.  I find that the compact camera that I carry in my purse has many more settings and is more adaptable for those quick shots while out and about.  The DSLR I'm still learning to use, but I'm getting some good results with it.  And then there is PhotoShop Elements 10, the software that I cannot live without! Almost all of my photos go through some sort of editing before they go on my blog.

For the actual making of quilts, here are a few of the tools I reach for all the time.


I am not a big fan of specialty rulers.  If I need directions to use it, it's too complicated!  I have a drawer full of them that I bought before I realized I used the basic 12 and 24 inch Omnigrids almost exclusively.  Of course there are a few others I use from time to time.  I'm not going to picture them here for you.


The Bias Square rulers from That Patchwork Place, however, I use almost as much as the Omnigrid rulers.  They are my go to rulers when making half square triangles and if you read me regularly, you know that I LOVE hs triangles and use them in almost every quilt I make.


Of course if you use the rulers, you have to have the cutter to go with them.  These 3 are my favorites.  They are comfortable to use unlike the original Olfa cutters.  If you haven't upgraded yet, do yourself a favor and try a newer version of rotary cutter.  There are others that are probably just as good, these are just my favorites so I see no need to buy different brands to try them.


And, then there are the mats.  In addition to the large one that is always on my cutting table, I have several other sizes and versions.  This one rotates to accommodate cutting different angles.


This was a gift and I absolutely love it!  Thank you, Becky!


This is a portable tool that serves 3 purposes.  The outside is a pressing surface.


Inside there is a sandpaper side for use with applique and a small Olfa cutting board.  I made this several years ago and it's great for taking on the road or even just to the family room to work on my lap.  There are marks on the sandpaper from one of my favorite making tools - a white gel pen that I use to mark lines on dark fabrics that I plan to hand piece.


Masking tape is a multiuse tool.  I've used it for marking stitching lines on a quilt while handstitching.  I also use it on the ruler when I'm marking a line which works better for me.  I have a lot of different widths tape so I can mark different sizes of straight lines to quilt.


If you sew, you usually end up ripping, too, at some point.  Several years ago I bought these two brass pieces.  One is a seam ripper and the other a stilleto.  If you are still using the same seam ripper you got when you were in Junior High, do yourself a favor and get a new one!  They do get dull.  This brass one has a removeable "blade" so you can replace just the blade part, though I've never done that.  I do have a few other cheapo seam rippers, this one "lives" next to the sewing machine.

And, of course, the sewing machine is the biggest tool and most likely the most expensive.  I love my Bernina 1230 and use it most of the time.  It is about 18 years old and still runs great.  A little preventative maintenance now and then goes a LONG way to keeping a machine humming.  I was shocked when I went to a sewing machine/vacuum store when we lived in AL and asked for sewing machine oil.  The employee or maybe it was the owner told me that no one used it any more so he no longer carried it.  WHAT!  I know that some of the newer computerized machines may not need oil, but most of us have other machines that need a bit now and then.  I use it almost every time I change bobbins as I clean the lint out and take the bobbin completely out to put a drop of oil on the metal part where it sits and does it's job of rocking back and forth.  Makes sense to me -- it's a moving part.  I leave the insides of the machine to the expert, but the bobbin maintenance is my job.

So, now that I've shown you a few of my favorite tools (yes, I know I did not mention anything about scissors - they need a post of their own!) please tell me what your favorite, go to tools are for quilt making or other sewing tasks.

xoxoXOXOxoxo,
Lois