Do you ever have Murphy's Law Days? I sure do!
I was all set Wednesday to do a tutorial on binding after I got the other stuff done that I had to do. Sometimes taking a day off work does not mean a relaxing day! In fact, usually for me it means I have a bunch of "have to do's" on my list. Finally about 2PM I got home and could start work on my plans.
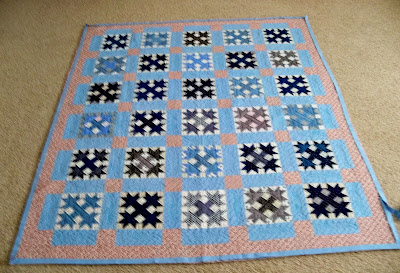
The binding for the Des Moines Star clone quilt was all prepared.
The final quilting stitches had been taken.
It was time to square up the quilt and bind it.
With rotary cutter and square ruler plus long ruler, I squared the quilt so it was ready to bind.
It seemed like a great day to write a binding tutorial as I do a couple of things a bit different than most people I know. I grabbed my DSLR camera ready to take some photos for the tutorial. Oops, the battery was dead.
So, I grabbed my trusty little carry along digital camera. Not as good, but I needed to get the machine part of the binding on that quilt!
First I took some photos of my Noah's Ark collection since I was on a step stool anyway. Well, there are other Noah's Ark items in other places, so off I went to take photos of them too. Hmm, shouldn't have gone off on that tangent of photo taking -- back to the task at hand.
So I started.
I always start the binding on the lower right corner of the quilt. No particular reason, it's just the way I do it.
I start with a 10" + the width of the binding and pin in place stopping 1/4" from the bottom edge. I only stitch about 6" of this leaving a tail at the top for joining later when I finish this side of the binding.
I measure, measure, measure! Before I ever start I measure the quilt 3 times across the width and the length -- center and both edges. If I've been accurate in my piecing and quilting, they are the same measurement. I need to know the measurement so the binding will be exactly the right length on each of the 4 edges. In this case all three of the width measurements were the same. All of the length measurements were the same as well, so no worries!
It's time to sew.
I stop 1/4" from the bottom edge of the quilt and back stitch. The binding is then folded at a right angle making sure the edge of the binding and the edge of the quilt are in a straight line. This is what makes that miter in the corner of the binding.
Pin the right angle in place at the edge and bringing the binding to the left with the raw edges even with the bottom of the quilt and pin the right angle on top of the binding.
Before I go any further on the binding, there are two things I do.
The first is in the next photo. I roughly go from corner to corner all the way around the quilt with the binding to make sure I will not have any seams in the corners of the quilt.
It is NOT a good thing if you do. So before measuring and stitching the second side check this out.
The second is to measure the binding so that from the fold it is 1/4" shorter than the measurement of the quilt.
This is what the quilt looks like at this point. The binding is not sewn except for the lower right side. There were not problems with those joining seams on the binding being in corners nor too close to where the final joining would be so it was time to move on.
The binding for the bottom is measured from the edge just sewn and folded. It needs to be 1/4" less than the measurement of the quilt since you will stop sewing 1/4" away from the edge. I put a pin in the binding and then pin the binding 1/4" from the edge of the left side of the quilt where I will stop stitching. The binding is pinned in place about every 1-1/2" so it will stay in place while I stitch. This step is repeated for the left side and the top. The final side is measured 10-1/4" less than the measurement of the length of the quilt.
The plan was to show you how I finish the joining. But, this is where Murphy;s Law comes in. It was too dark to take a photo by that time. So, a true binding tutorial will have to be written later. I know it was a tease to tell you all the steps except the final one. Actually I skipped a couple of other steps, too. And, I forgot to take a photo of a couple of the steps. When I really do write a tutorial, I will start in the morning and make sure the good camera is charged and ready to go. One of the Noah pieces I photographed (which is probably why I ran out of daylight) has a slogan on the bottom. It reads, "Plan ahead, it wasn't raining when Noah built the ark."
If I'd planned ahead better, this would be a true tutorial.
So, I'll ask you again, do you ever have days like this? At least I am now doing the hand stitching on the Des Moines Start Clone quilt. Soon I'll be taking a photo of it completed before giving it to Mindy and Mike. If you missed the post about the antique Des Moines Star, you can find it
here.
Until Next Time,
Lois


